Day 124 – Back to Basics – Ball, Cube, and Cylinder – Updated

Maybe I’m feeling a little sad that the lighting class is just about over. I was in the first group so my final project was critiqued at tonight’s class. Next Tuesday we will critique the second half of the class and then say our good-byes. I’m not eligible to take the advanced lighting class as I have not taken the color class which at this point is an impossibility since it is only offered during the day (9 – 11:45 am), and there is no way I can leave work for 4 hours a day twice a week to take the class.  Not that my learning will stop. I’ll just have to look elsewhere.

Anyway, our first assignment was to shoot a ball, cube, and cylinder using a single light source.  This assignment was to get us to “see” the light: its intensity, the quality of it, how it falls on objects of different shapes, planes, angles,  etc.

At the time I wrote:

It seems simple enough: shoot a white cube, sphere and cylinder against a white background using a single light source.  Simple, yes. Easy? No!  Here’s the catch: Nothing can bleed into anything else. All planes must be distinct, including the backdrop and the table top.   This is the hardest thing I’ve ever done, photographically speaking.

My results at the time were less than stellar, even after hours upon hours over several days of trying to get it right:

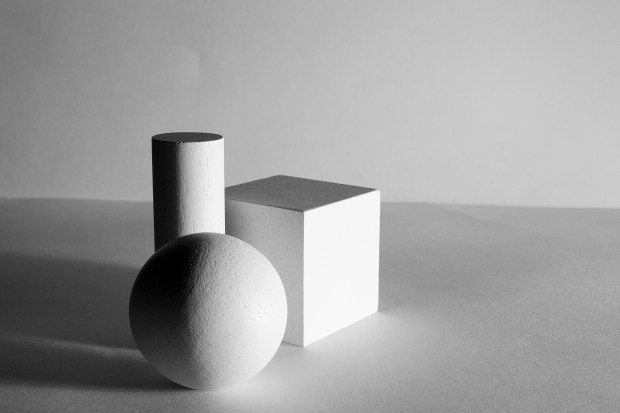
Jeff challenged us at the time that if we wanted to, we should re-shoot this assignment, once the class was over, using what we’d learned in the class.  I gave it a shot tonight. It didn’t take me long to get close to what I was looking for.  Not perfect, but not bad for just a few minutes of trying.  I may give this a longer whirl this weekend.

I guess I might have learned something.

08-May-2012: After looking at this last photo again, I’m still not satisfied. Top of the cube and cylinder are too close to the shade of the background. Will. Keep. Trying.

In the print lab

We are supposed to bring in a couple of “tentative” prints for our final project tonight, so I was in the print lab last night processing and printing. When this one came out of the printer, I stopped short.  He is just one of the couple hundred people who came for dental treatment at the MOR event last weekend.   He was one of the lucky ones – his number in the lottery was drawn.

As you can see, his face reflects a life I can’t know anything about, but he was kind and he was gentle and he trusted me to take his picture.

I have no idea if WordPress is going to do this fellow justice.  I love how the actual photograph came out.

Day 108 – School Night

A few photos from school tonight.

Caught this guy on his skateboard as I was heading to class.


The first floor hallway of the art building.


Is this where I tell you I messed up and didn’t print my assignment? I thought we were going to show JPEGs.  Guess where I will be tomorrow?

Anyway, after critique we all grabbed our cameras and flashes and remotes and headed outside for a lesson on how to shoot with flash outdoors and still have a lovely photo.  To get the background to have detail and color and not blow out the subject, essentially you expose for the background, then stop down two stops, and adjust your flash to light your subject. After a lot of trial and error, my partner and I seemed to get the hang of it.  I get the concept. Now I must practice, practice, practice!


My partner.  This was shot in a well-shaded area with bright light behind her.  A little blurry, but you get the idea.


Another classmate working with two others and using a remote flash trigger to light their subject with two Speedlites.  I took her picture with my flash, and it set off the other Speedlite being held by her partner.

Day 106 – Serendipity

Sometimes you just get a lucky shot.

A friend of mine posted a link to this Virtual Lighting Studio (be patient…it takes a while to load). Of course, I had to play with it. What’s really cool about it is that once you find a look you like, you can save it as a jpeg. When you open said jpeg, you see not only your image, but a diagram on where to place the lights to get the same effect. Pretty nifty, huh?

And so you know, I felt the call to try it out. I clamped a dark blanket to our living room windows to block out the bits of sunlight that leaked through the wooden blinds. I shoved the hutch away from the tall wall and pushed the sofa and love seat to each side of the room. I grabbed my studio lights and set them up, along with my camera.

“NO!” I told myself. “Get your taxes done. THEN you can play. And while you’re at it, start some laundry.”

Sigh. Okay…

I quickly worked through our taxes (and lo and behold, we’re getting a bit back – taking a couple of photography classes at the university does have other benefits!)

I finally was able to get going, and just had some fun for a bit. But the best moment was when Maya jumped up onto the chair I’d been posing in. She’s a bit shorter than I am.

As for what I was trying to accomplish in session today…highlights in my hair and a defined jawline.  It’s all about seeing the light.

Main light (soft box) was in front of me to camera left and high, angled down. Second light (soft box as well) was behind me and to camera right. Slightly lower than the main light. This light got moved quite a bit during the session to try to give me what I was going for. I moved it closer, raised it, brightened and dimmed it.

I know I'm not smiling, but look at the highlight on my cheek, and my jaw looks great!


I really like the highlight along the right side of my face. Nicely lit hair too.

I'm liking the hair and the cheekbones.

I need to get to know Lightroom

I bought it a few weeks back when it was on sale, but haven’t really fiddled with it much. I need to!

Here is one of the shots taken last night processed in Adobe Lightroom and adding the B&W Creative – Creamtone preset. I kinda like it.

Day 101 – Under the wire

Apologies. Nothing to write home about here. It’s been a busy day and I spent the hours after class tonight processing photos I shot in Jeff’s studio last week. Our class shot three models and we are required to provide some shots to each of them for their portfolios.   The hour was getting late so I quickly set up my studio lights and shot a few self-portraits to try out some lighting effects.

I shot these with the light above my head to camera left and a fill card at camera right.  Shot at f/1.8, just for fun. I have to apologize…not my best work.

Light a Structure at Dusk – Assignment Re-Do

Our 10th assignment for our lighting class was to photograph a building at dusk with multiple flashes, taking care to show the texture and dimensions of the building. Once we’ve gone through critique night, we have the opportunity to re-shoot the assignment, if we wish.

My original shot. Really, I only was able to get off two flashes before the timer on the camera clicked off. Further, it was freezing when we were out shooting and I thought I’d done okay.   The sun had been down for at least a half hour, but the clear sky stayed brighter than I would have liked. Exposure time: 20 seconds.

My instructor said he would have liked to see more detail on the right and in the area to far left, so I went out last night to re-shoot.  Here is the result.  The sky was overcast,  I was dealing with a street lamp to camera left and I used a longer exposure time (about 45 seconds). In this shot I got six flashes off.

Hope he likes this one better.